I accidentally permanently deleted important files on my Mac and realized too late that they weren’t in the Trash or backed up with Time Machine. These documents and photos are really important, and I need help figuring out if Mac file recovery is still possible and what steps I should take next without making things worse.
I’ve been there. You clear the Trash, go back five minutes later, and your stomach drops because the one file you needed was in there. It feels final. Sometimes it is. Sometimes it isn’t. What matters most is what you do right after.
First thing, stop using the Mac. I mean it. Don’t install apps. Don’t download random stuff. Don’t move a pile of files around. Skip updates. When macOS deletes something, it often removes the reference first and leaves the data sitting there until new data takes its place. If you keep using the machine, you raise the odds of wiping out what you’re trying to get back.
I’d check the easy stuff before touching recovery tools:
- Search in Finder by filename, file type, or rough date.
- Open Trash again and look slowly. I’ve missed files in there before.
- Press Command + Shift + . so hidden files show up.
- Go back to the folder where the file used to be.
- Sign in to iCloud and look through Recently Deleted.
If none of that works, I’d check backups next. If you use Time Machine, go to the folder where the file lived, enter Time Machine, roll back to a point before deletion, and restore it. This is usually the cleanest fix. You get the original file back without having to sort through junk scan results.
Another place worth checking is APFS snapshots. A lot of Mac users forget these exist. Newer macOS versions often make local snapshots before updates or system changes. Open Disk Utility, pick your APFS Data volume, and see if a snapshot from before the deletion exists. If you find one, you might be able to mount it and copy the missing file out by hand.
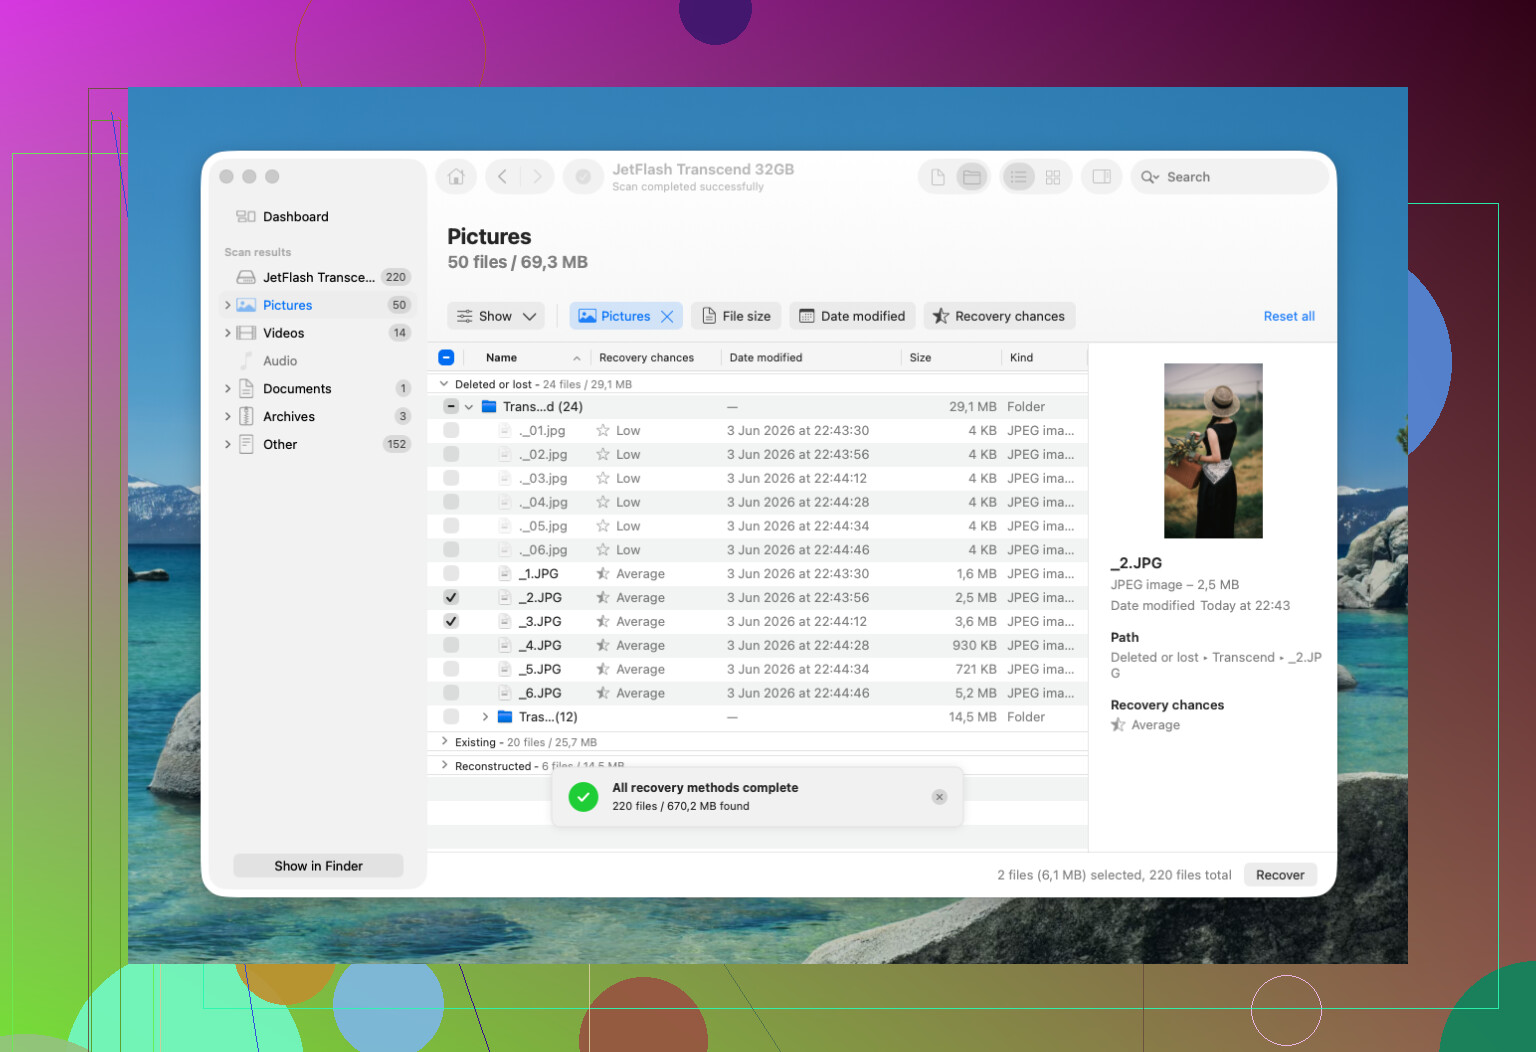
If backups and snapshots go nowhere, then I’d move to recovery software. Disk Drill is one people tend to start with because the layout is simple, it works with current macOS versions, and you can preview files before restoring them.
The usual flow looks like this:
- Install the app, preferably on an external drive.
- Select the drive where the file got deleted.
- Run the scan.
- Go through the results.
- Preview anything that looks right.
- Recover the files to a different drive, not the same one.
One catch, and it matters a lot. Most newer Macs use SSDs with TRIM enabled. TRIM helps the drive stay fast by clearing blocks from deleted files. Good for speed, bad for recovery. On an old spinning hard drive, deleted data might hang around for days, sometims longer. On a modern MacBook SSD, your window might be short.
I’d skip DIY and look at a recovery lab if any of these are true:
- The Mac had water damage or some other physical hit.
- The SSD does not show up right.
- The drive keeps disconnecting, freezing, or throwing read errors.
- Recovery software can’t read the drive.
- The files matter enough that you don’t want to risk making things worse.
If it were my Mac, I’d go in this order. Finder. iCloud. Time Machine. Then APFS snapshots. If all of those fail, start a recovery scan right away and save anything recovered to another disk. Speed matters here. A lot of successful recoveries happen because someone stopped poking around and moved fast.
1 Like
Yes, there is still a shot, but your odds depend on one thing, where the files were stored.
If the deleted files were in iCloud Drive, Photos, Notes, or another synced Apple app, check the web version of each service. Apple keeps separate Recently Deleted areas, and they do not always match what you see on the Mac. I’d start there before scanning the disk.
I slightly disagree with @mikeappsreviewer on one point. I would not spend too long hunting around the Mac itself. On SSD Macs, time matters. Every login, cache write, browser tab, and app launch chips away at recovery odds.
Best move is this:
- Stop using the Mac.
- If it’s a desktop, shut it down.
- If it’s a laptop with critical work on it, boot from an external drive if you have one.
- Scan the internal drive from another system or external macOS install.
This matters because most modern Macs use APFS on SSDs, and deleted blocks often get cleared fast. If FileVault was on and the deleted data got trimmed, software recovery gets ugly fast. On older hard drives, success rates are much better.
If you want software, Disk Drill is a common first pick because it handles APFS well, previews files, and is easy enough to sort through without wasting hours. Install it somewhere else, not on the same drive. Recover files to an external disk too.
For search terms, look for Mac file recovery software for deleted documents and photos. Same idea, less clunky.
Also, check app-specific recovery:
Pages, Word, and some photo editors keep autosave or temp versions.
Mail attachments might still exist in Library caches.
Preview and Photos sometimes leave local remnants.
This short clip is worth a look if you want a quick visual on recovery steps:
see a quick Mac file recovery walkthrough
If the files are irreplaceable, family photos, legal docs, client work, skip more DIY after one clean scan. A recovery lab costs more, but so does losing the data forevr.

I mostly agree with @mikeappsreviewer and @mike34, but I’d add one thing people skip way too often: check app-level version history before going full recovery mode.
If the deleted stuff was Office docs, Pages files, or even some PDFs you edited in cloud-synced folders, there may be older versions sitting in the app or service itself. Finder won’t show that. Same with Google Drive, Dropbox, OneDrive, Adobe cloud stuff. “Permanently deleted” on the Mac does not always mean gone everywhere.
Also, slight disagreement with the “shut it down instantly” advice. If you do not have another Mac, external boot disk, or recovery workflow ready, panicking and power-cycling can just create more confusion. The real point is stop writing new data. Be calm, be methodical, don’t start clicking around like a maniac lol.
What I’d do next:
- Check iCloud.com and any cloud storage version history
- Check app-specific recovery folders and autosave
- Use Terminal to inspect snapshots if Disk Utility shows nothing obvious:
tmutil listlocalsnapshots / - If snapshots exist, mount or browse them
- If not, go straight to recovery software
For software, Disk Drill is still one of the more practical Mac data recovery options because it handles APFS better than a lot of old junk tools floating around the web. Preview first, then recover to an external drive only. Do not restore back onto the same Mac volume. Thats how people nuke their own recovery chances.
One more thing: if your files were photos, check the Photos library package itself. Sometimes originals or thumbnails still exist inside the library bundle even when the app view looks empty. Same idea for mail attachments buried in Library containers.
If you want a fast visual guide, this quick Mac deleted file recovery video is actually more useful than most bloated tutorials.
If Disk Drill finds nothing and the files are truly irreplaceable, stop there. Don’t keep rescanning 12 times with diff tools hoping for magic. That’s when a recovery lab starts making more sense, even if it hurts the wallet a bit.
One thing I’d add to what @mike34, @himmelsjager, and @mikeappsreviewer already covered: check whether the files were ever opened from another app, not just stored on disk.
A weird but real save path on macOS is this:
- Recent Items in the Apple menu
- App-specific recent files lists
- Auto-recovery folders for Word, Excel, Pages, Photoshop, Preview
- Temporary export folders if you emailed, printed, or attached the file recently
I slightly disagree with the “go straight to scanning” approach if the files are documents. For docs, version history and autosave leftovers can beat raw recovery because recovered SSD data often comes back fragmented or unnamed.
Also, if your Mac uses iCloud Desktop & Documents, verify whether another Apple device still has a local copy. An iPhone, iPad, or second Mac sometimes lags deletion long enough to save you.
If you do need software, Disk Drill is a reasonable option.
Pros:
- Good APFS support
- File preview helps cut noise
- Easy interface
Cons:
- Scan results can be overwhelming
- Recovery on TRIMmed SSDs is still hit-or-miss
- Full recovery is paid
If you use it, recover to an external drive only. If the files are absolutely irreplaceable, I’d do one careful pass, then stop and consider a lab. Repeated DIY attempts usually just waste time.