I took several iPhone Live Photos and now need to turn them into still images, but every method I’ve tried seems to lower the photo quality. I want to keep the original image resolution and sharpness while removing the Live Photo effect. Looking for the best way to remove Live Photo on iPhone without losing quality.
I ran into this a while back. Somewhere along the way, my iPhone started saving almost everything as a Live Photo. I almost never played the motion part, so all it did was eat storage. I wanted to keep the photo, lose the clip.
I tried doing it with Apple’s own stuff first. It works, sort of. For a small batch, fine. For a phone full of them, no thanks. Duplicating each one as a still image and then deleting the Live version got old fast. I quit after a few minutes.
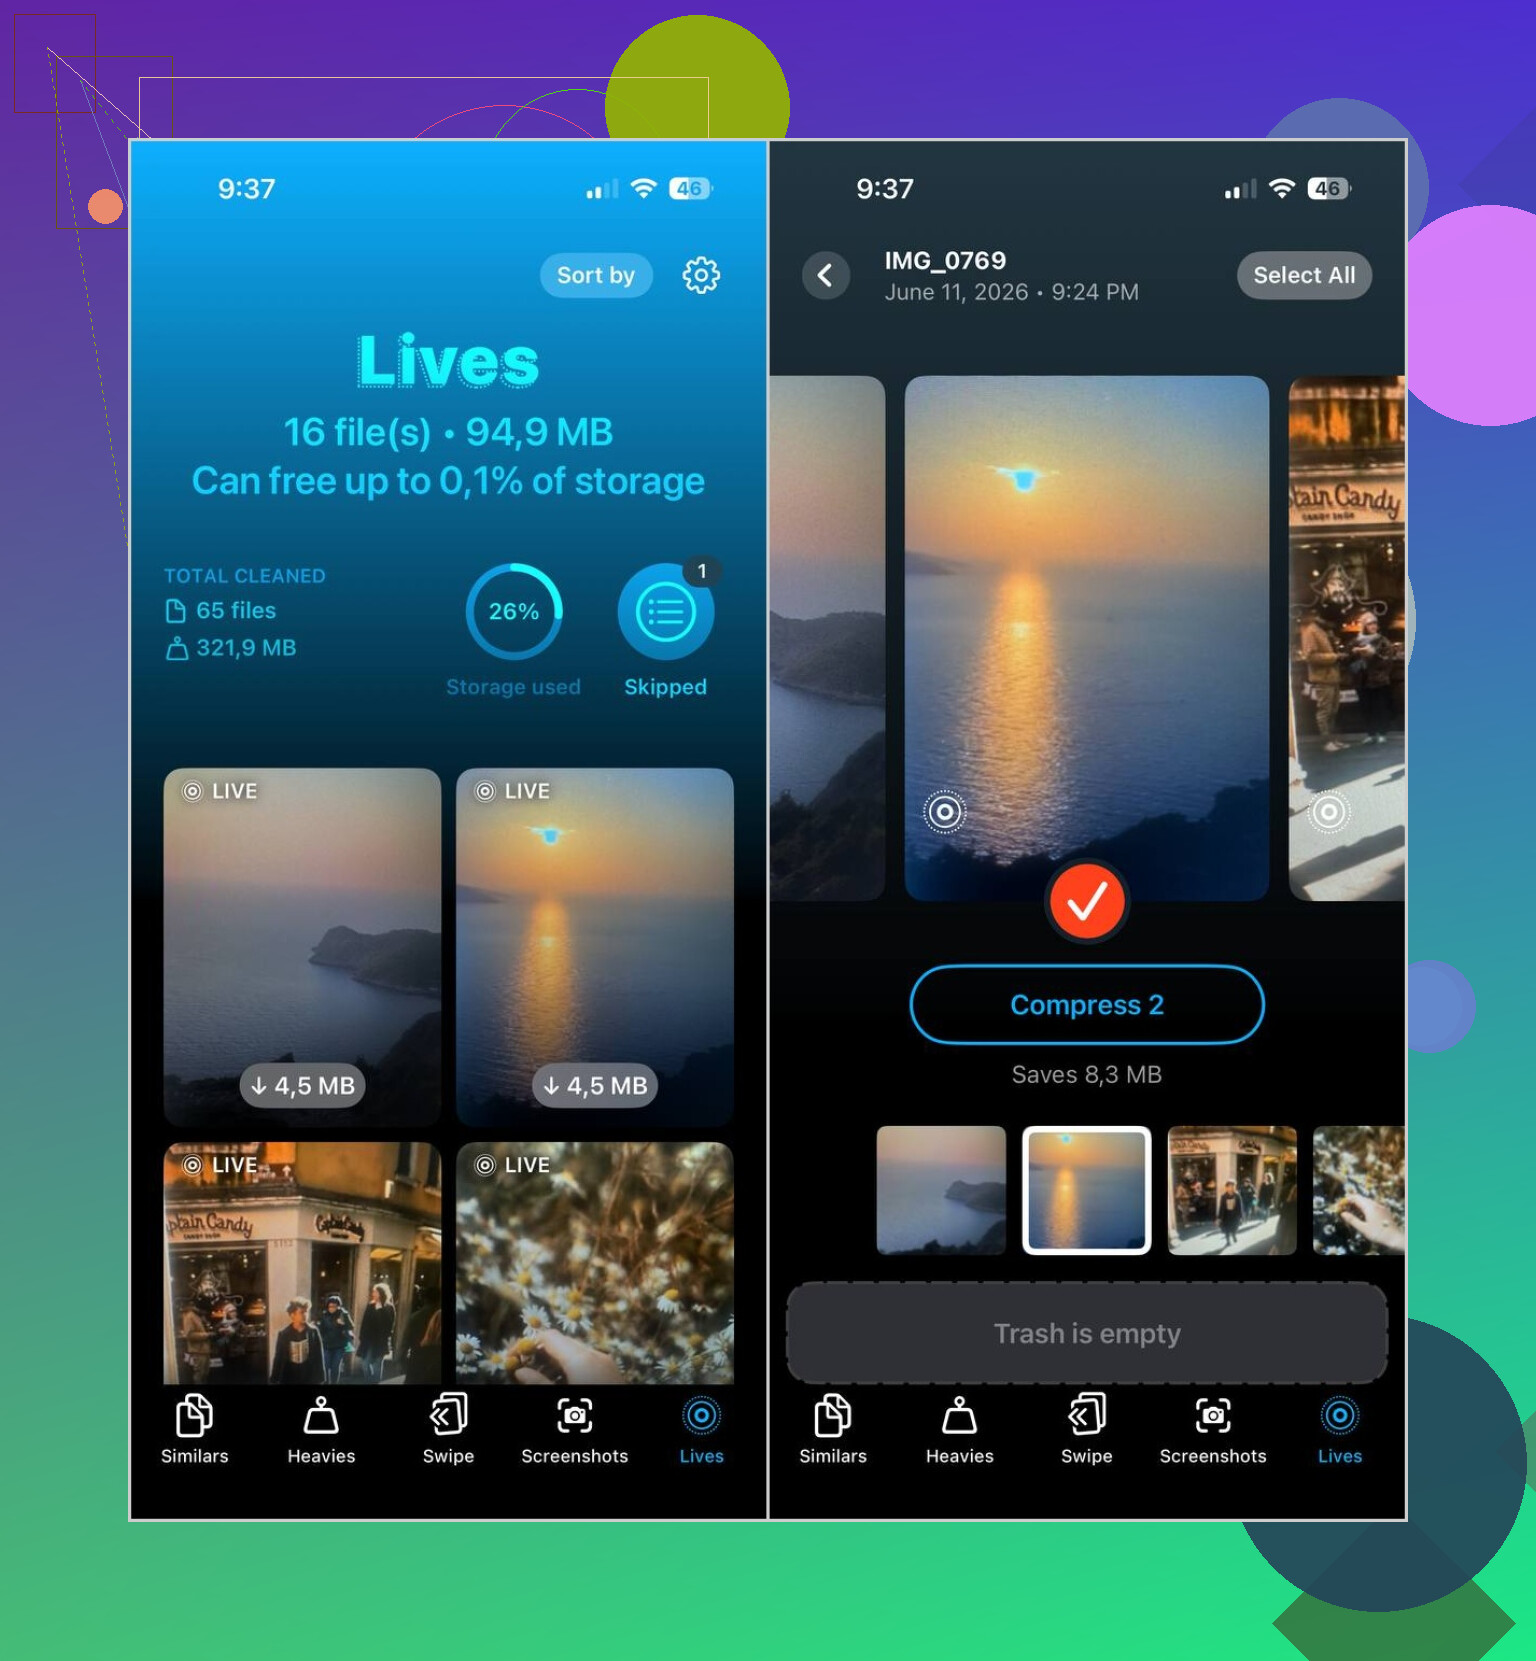
What worked better for me was Clever Cleaner. I opened it, tapped the Lives section, and it pulled all my Live Photos into one place. No scrolling through random albums. No guessing what was saved as a Live Photo and what wasn’t.
Here’s what I did:
- Open the Lives tab
- Sort by size if you want to clear the biggest files first
- Pick the Live Photos you want changed
- Tap Compress
- Check the still-image versions
- Remove the original Live Photos after you confirm they look right
One part I liked, it shows the storage savings before you run it. Then after conversion, it asks what to do with the original files. I liked having to confirm it, less chance of deleting something by mistake. I get paranoid with photo cleanup tbh.
I kept using the app after that. The Live Photo cleanup was only one part of the mess on my phone. I used Similars for duplicate shots, Heavies for huge videos I forgot I had, and Screenshots for old junk screenshots. If I’m being honest, those cleared out more space than the Live Photos did.
Also, if you don’t want this problem again, turn Live Photos off in the Camera app and make it stay off. Open Camera, tap the Live Photos icon near the top until it’s crossed out, then go to Settings > Camera > Preserve Settings and enable Live Photo preservation. If you skip that part, iOS has a habit of flipping it back on. I missed this the first time and had to do the cleanup twice. Annoying.
So my fix was pretty plain. Convert the Live Photos you already have into stills, delete the originals once you check them, then stop the camera from making new ones. After I did that, the issue was done and I stopped thinking about it.
1 Like
If your goal is zero quality loss, don’t “convert” with third-party compression first. That part is where people get tripped up.
A Live Photo already contains a full still image. On iPhone, open the photo, tap Live, switch it to Off, then tap Done. That keeps the same key photo, same resolution, same sharpnes. You remove the motion effect, not the photo data. For one-offs, this is the cleanest fix.
If you need a separate still file for sharing or batch cleanup, export the original with no edits through Photos on a Mac, or use Image Capture. AirDrop usually preserves quality too if you send as original. Some apps shrink or recompress, so I’d avoid random “save as JPG” tools.
I slightly disagree with @mikeappsreviewer on one point. Batch tools are nice for storage, but they are not my first pick if image fidelity is the top priority. I’d verify a few files first at full zoom before doing hundreds.
If your main issue is space after removing Live Photos, Clever Cleaner is still worth a look for organizing the mess after you preserve the photos you want. Also, this is a decent resource on freeing up iPhone space for free: how to clear iPhone storage fast and free.
For future shots, turn Live off in Camera and keep it off in Preserve Settings. Saves a lot of annoyng cleanup later.
If you care about actual image fidelity, I’d avoid screenshots, messaging apps, and most “convert to JPG” workflows. That’s usually where the quality drop happens, not from the Live Photo itself.
One thing I’d push back on a little from @mikeappsreviewer: storage apps are useful, but “compress” is not the word I want anywhere near photos I’m trying to preserve at full quality lol. And @viajeroceleste is right that the still image is already inside the Live Photo, but just toggling Live off does not always create a separate plain-photo file, which matters if you need to send/archive it as a normal image.
What has worked best for me is this:
- On iPhone, open the Live Photo
- Tap Edit
- Tap the Live Photo icon
- Turn Live off
- Tap Done
That keeps the key photo and usually avoids any visible loss. If you need a true separate still file, use Share > Save to Files or import to a Mac and export the original image there. That’s a lot safer than random converter apps.
Small caveat: if your phone shoots in HEIC, the image may stay HEIC. That’s not lower quality, it’s just a different format. People confuse that part allll the time.
If your bigger problem is cleaning up a ton of Live Photos after you preserve the ones you want, then Clever Cleaner is still practical for sorting and finding them fast. I just wouldn’t blindly batch-process before checking results at full zoom first. Also worth a read if you’re trying to reclaim space without making a mess of your library: best guide to free up iPhone storage with Clever Cleaner.
Also, turn Live off in Camera permanently after this, or iOS will happily keep making this your problem again.
One extra angle nobody’s mentioned clearly: if you want the still with the exact original quality, use Duplicate first, then turn Live off on the copy. Reason: it preserves the untouched Live original as a fallback while giving you a plain-photo version to test against at full zoom.
I slightly disagree with @viajeroceleste on “Live off is enough” for every case. It’s fine visually, but if you’re archiving, I prefer keeping one original until I confirm metadata, format, and resolution all match what I need. @himmelsjager is right to be suspicious of anything labeled “compress,” and @mikeappsreviewer is right that scale matters when you have hundreds.
My rule:
- Best quality: stay inside Apple Photos as long as possible
- Best safety: duplicate first, compare info panel, then delete the Live version only after checking
- Best batch cleanup: use Clever Cleaner only after you’ve tested a few samples
Clever Cleaner pros
- Finds Live Photos fast
- Good for bulk sorting
- Useful if storage is the real problem
Clever Cleaner cons
- “Compress” wording is scary if fidelity is your priority
- Batch actions can hide mistakes
- You still need to verify output before deleting originals
Also, check whether Optimize iPhone Storage is on in Photos settings. Sometimes people think the image got worse, but they’re just viewing an optimized preview, not the full original. That setting causes a lot of false alarms.